 A weekend morning in our house is not complete without a homemade breakfast. A lot of the time it’s waffles but almost as often we end up making pancakes. I have always been a huge fan of pancakes (and pumpkin pancakes in the fall!) and never make any recipe for classic blueberry pancakes other than the one I got from my mom, who got it from my grandma. I’m not sure where this recipe originated, but it’s the one we’ve been cooking up since I was a little girl and to me there’s nothing tastier. There have been many a drop of pancake batter spilled on this old recipe card, but by now I’ve cooked it so many times I know the whole thing by heart.
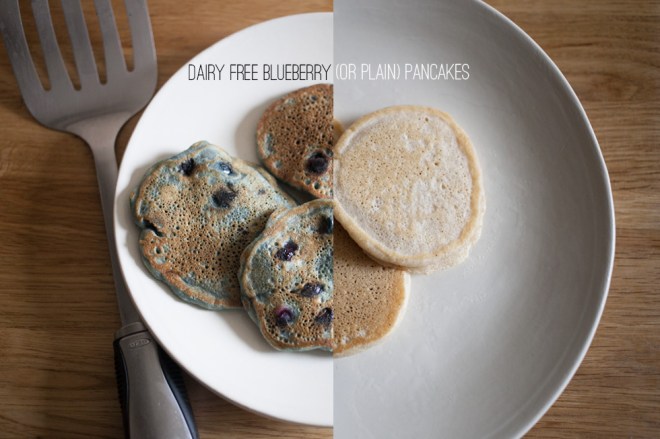
 When my youngest daughter Edith was born and we realized that she had a dairy allergy, the classic family pancake recipe was suddenly out of the question. The version I created to replace it uses just a few little tweaks and has become something just as tasty that our whole family (Edith included) can enjoy. If you aren’t dealing with anyone who avoids dairy you could certainly go back to the original recipe ingredients (whole milk and real butter) but I actually sort of prefer the taste and texture of the non-dairy version.
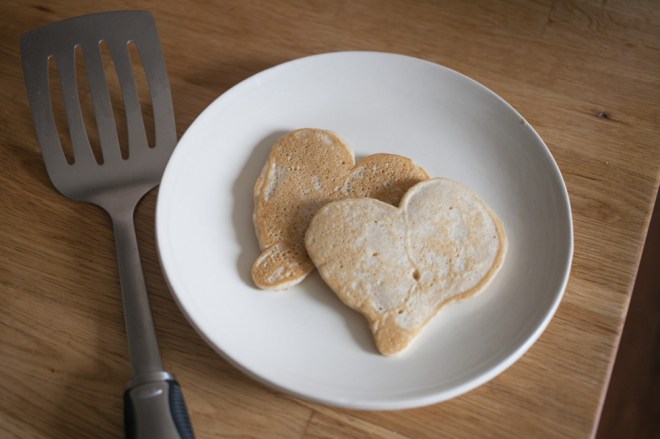
 My grandma’s recipe called for blueberries (and I LOVE blueberry pancakes) but sometimes the kids would rather have heart shaped pancakes instead of blueberry ones. Most days we do a few of each. These are just as good without the berries (thanks to a healthy dose of cinnamon) so whether you add blueberries or not they’re sure to be delicious.
 The key to a perfectly cooked pancake is to not rush it – patience is a virtue when it comes to your griddle. If it’s too hot you’ll have burnt outsides and gooey insides. Aim for a low to medium heat and get a cup of coffee to sip while they cook nice and slowly. When bubbles start to cover the top side you’ll know it’s time to flip them over.

In our house we like to keep things simple and with as short of an ingredient list as possible, so I love that I can substitute coconut oil into most of my baking in lieu of butter. It is just one simple ingredient that’s easy to have on hand and better for you than manufactured products like vegan butter. It does, however, leave a bit of a subtle coconutty tropical taste (and smell, mmmm) so if coconut isn’t your thing, feel free to use your preferred dairy free butter substitute. My older kids have never commented on the switch from butter to coconut oil and I love the taste!
Grandma’s (newly dairy-free) blueberry pancakes
- 1 cup almond milk
- 1 well beaten egg
- 1/8 cup melted coconut oil
- 2 Tbsp sugar
- 3/4 tsp salt
- 2 1/2 tsp baking powder
- a good hefty dash of cinnamon
- 1 cup flour
- 1/4 cup blueberries
Directions
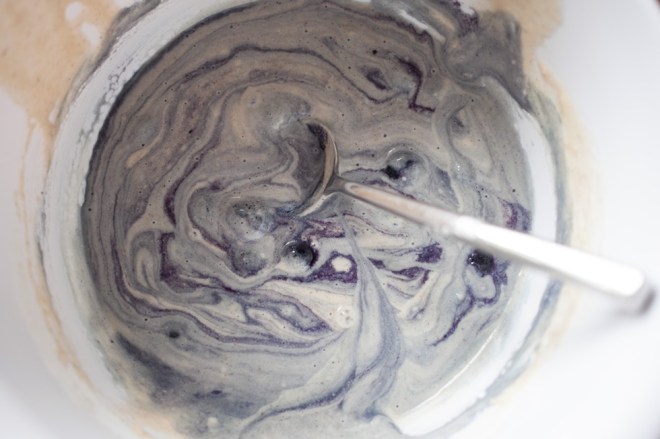
In a large bowl, beat egg together with almond milk and melted coconut oil until thoroughly combined. Add sugar, salt, baking powder and cinnamon and stir well again. Once all ingredients are well mixed, add in flour and stir until just combined, being careful not to overmix. Add in blueberries if desired. Heat griddle over low to medium heat. Spoon batter onto griddle and allow to cook until bubbles form on the top side. Flip and cook until lightly browned on both sides. Enjoy!
 My kids are waffle fanatics. I personally prefer pancakes, but when you’re making breakfast for five it’s best to go with the crowd… and the crowd in our house adamantly cheers “WAFFLES!” at least once a week. I know that when most people think of waffles on a hectic weekday morning they think eggo – but I promise that these whip up in barely more time than it takes to toast a ready-made waffle, and they are infinitely more tasty!
 For me, the secret to the world’s fluffiest waffles is tons and tons of whisking. I whisk the liquid ingredients into a proper frenzy before adding the dry ingredients (except for the flour, don’t forget to wait on the flour!) then giving it another big whisking before adding the flour and giving one last stir.
  My batter is always crazy light and bubbly, but it makes some of the fluffiest waffles known to man!
  I’m providing two versions of this recipe today – and I liken the difference between them to the difference between a sinful nutella crepe and it’s slightly less decadent cousin the galette de sarrasin (buckwheat crepe). They’re both delicious and I personally would eat either one any day of the week – but some days you might feel just the tiniest bit guilty that your nutella crepe isn’t ticking all the nutritional check-boxes and long for something with ever so slightly more of a nod to health. In that case go for the wheat waffle with slightly less oil. I discovered that these waffles would still turn out with zero oil during a hectic morning when I omitted it entirely. In this version I add a little oil but not quite as much – it’s still delicious (especially with some jam like my kids eat them) but never quite *as* delicious in my opinion as the original waffle (topped with whipped cream, of course).


