It’s the time of year where I start to think about sewing Halloween costumes for the kids and in between frantically searching “Elsa ice queen costume” and “Anna jumper tutorial” I suddenly realized that I never shared photos of the costumes that I made for them last year. The girls were (are) in full on princess obsession mode and each chose their favorite, and Paul wanted to coordinate but was adamant that he wasn’t going to be a prince. I stumbled on this tutorial for a Pascal costume (the sidekick iguana from the Disney movie Tangled… if you’re not familiar) and he was instantly sold since Edie was already planning to be Rapunzel from Tangled. I didn’t take photos of my process of making the costumes because a) I don’t have time for that sort of stuff these days and b) most of the ideas I used in making the costumes were gathered from other generous bloggers who had shared their completed projects and processes. Instead I’m sharing links where applicable. And lots of photos… because I just couldn’t resist.

I took the photo below while the costumes were still in progress so the yellow wrap on the Belle costume wasn’t finished, but this is the best shot of Pascal’s tail, the twirliness of the Rapunzel dress and the major poof in the Belle costume.

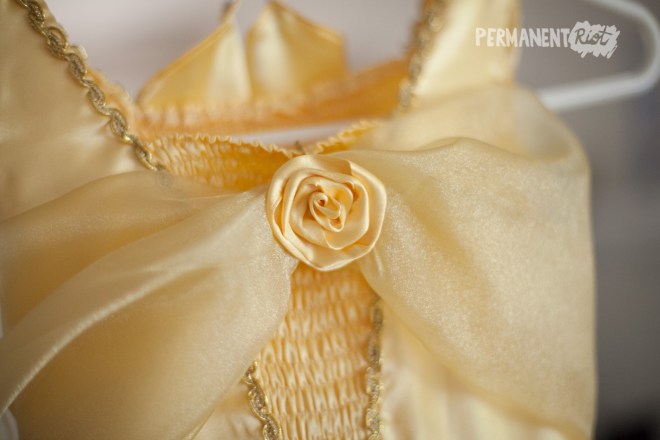
The Belle costume was sewn almost 100% as written directly from this amazing tutorial for a child’s Belle costume. I couldn’t possibly write enough good things about this tutorial. It had so many great ideas, especially the shirring. What a genius idea for a kid costume – no zippers or buttons and it fits a wide range of sizes. It’s never going to look baggy. It was perfect. The tutorial was written for a toddler so I knew the skirt wasn’t going to work exactly the same way on a much taller child. I added more width and also planned for and sewed a simple petticoat to go underneath for maximum poof factor. I also made some quick and easy yellow fingerless gloves, based on this tutorial. Add a rose and hair donut and presto. Belle is ready for the ball!

The Rapunzel costume was a combination of many tutorials and as you might guess… sort of (extremely) involved to sew. I took the basic idea for the bodice construction from the Belle tutorial (because, once again, shirring! Genius!) but added lace detailing at the top and bottom and a couple of ribbon loops for lacing in front. I used some sleeve tricks from this other Rapunzel dress tutorial (coordinating with the Pascal tutorial from earlier). I sewed the stripes on as shown in the tutorial, but attached the sheer portion before sewing the entire thing into a finished sleeve. It took me a couple of tries to get the order of operations right, but I think it was worth the effort. I decided that the skirt had to be a full circle skirt to really match with the movie and I used two colors of fabric panels to mimic the center underskirt. I don’t have an embroidery machine (or the kind of time required for hand embroidery or applique) so all of the detailing on the skirt is painted on. I finished up the costumes too late to order a wig online (and most of them were over the top expensive anyway) so I made a yarn wig from this tutorial and glued in silk flowers to finish it off.
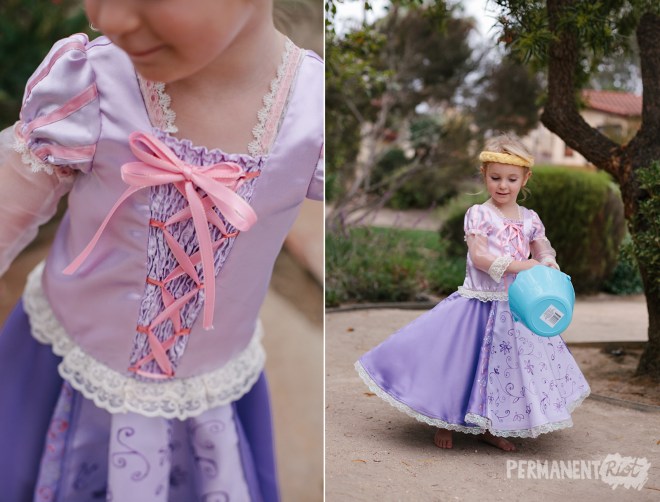

Rapunzel! Rapunzel! Let down your hair! She was insistent that the yarn wig reach all the way to the ground for authenticity, so she spent a lot of time with it looped over her arm in an attempt to keep it from getting dusty.

Pascal was constructed entirely from the tutorial I linked above. Why mess with a good thing? Especially when it is so quick and easy.

The kids had a total blast on Halloween showing off their costumes… but my favorite part of the entire project was seeing them with the “real” Rapunzel and Flynn Rider at Disneyland. I can’t wait to get started on the next batch of princess costumes!

