Patchwork scrap quilt – 8 years of scraps!

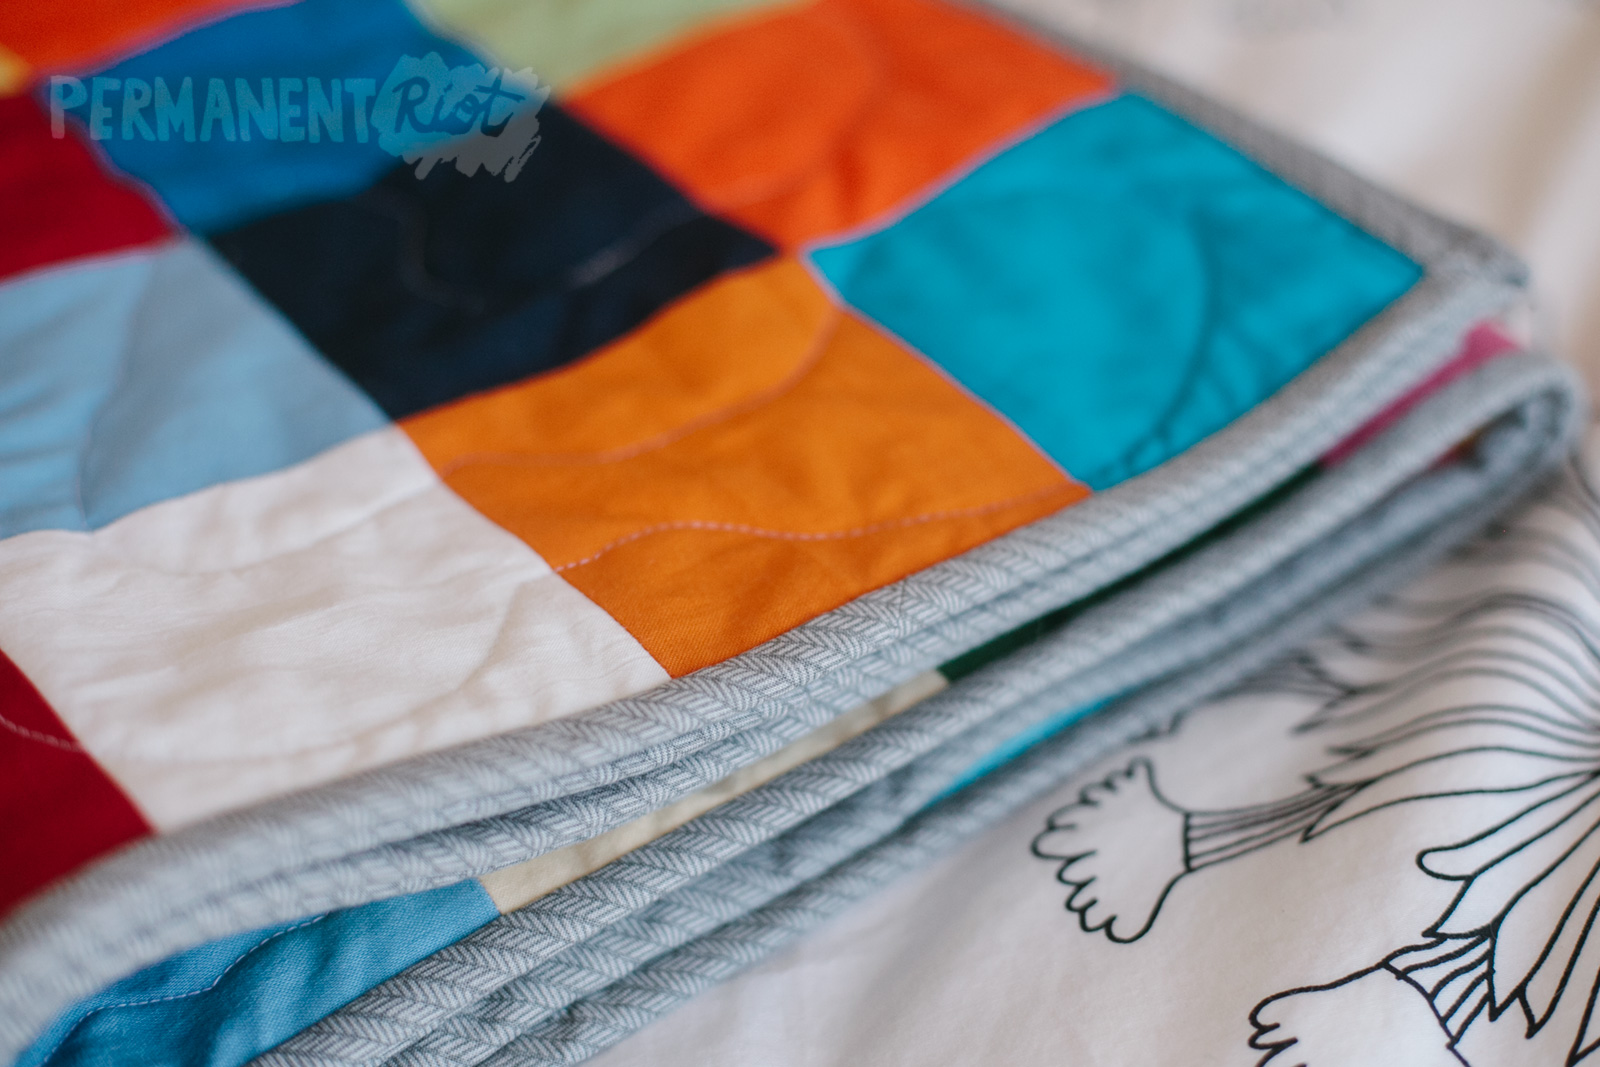
My patchwork scrap quilt is finished! This is the most time intensive quilt I’ve made to date (so many squares!) and includes scraps from the past eight years of sewing. It was a serious labor of love, and I considered chucking the whole thing out the window three or four times before it was finished.

patchwork-scrap-quilt-1

I didn’t want to use strip piecing because I was hoping for a more random arrangement of squares, so each square was individually cut and painstakingly arranged (I always overthink that part!) I sewed the front blocks together using interfacing, which I had read was a shortcut for piecing small squares. It ended up being a major pain and if I were to redo the quilt I think I’d skip it the next time around. The back piecing was done without interfacing and I feel like it went more quickly while still being just as accurate.

patchwork-scrap-quilt-4

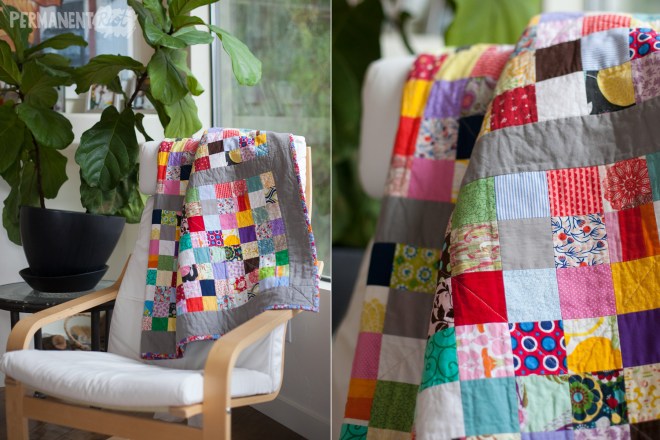
The fabrics I used are not only quilting scraps but scraps from dresses I made for my girls as toddlers and the overalls I made for my son’s first Easter. There are scraps from bags and baby blankets and Christmas gifts… when I look at this quilt I am flooded with memories of all of the things I’ve made, which is a pretty great feeling. I also got the added bonus of majorly cleaning out my fabric cabinet. I cut all of the remaining scraps down into manageable and regularly shaped pieces and folded them neatly, and tossed all the tiny pieces. It’s nice to finally feel like I’m not drowning in fabric (for the moment).

patchwork-scrap-quilt-2

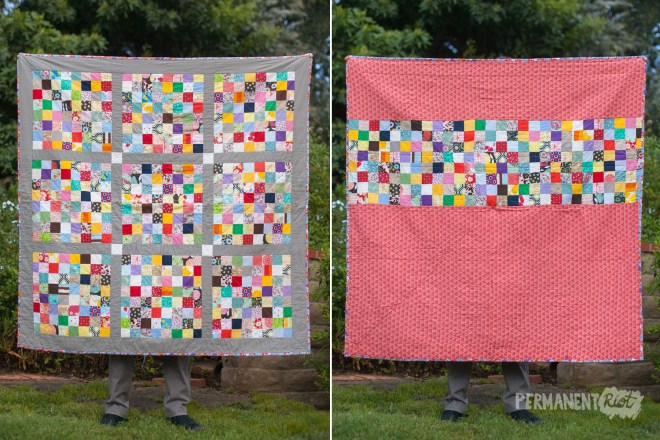
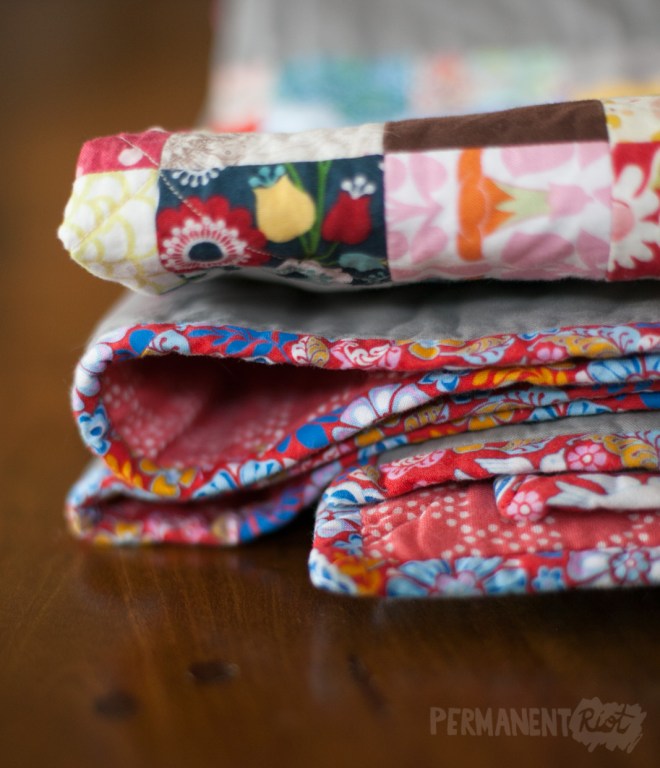
The quilt is backed in a super soft double gauze cloud 9 cotton with a strip of pieced squares down the middle. I love how soft it is, but it did wrinkle a little bit underneath while I was quilting it together so it’s a little wonky. As is everything I make. I think the softness makes up for the imperfections. It’s bound in a crazy patterned bias binding that I made… I figured the total lack of cohesion in the fabric patterns called for something extra outrageous as binding.

patchwork-scrap-quilt-3

Hooray for finished quilts, hooray for using up years worth of scraps! It’s my new favorite blanket.

Advertisement
Patchwork scrap quilt – 8 years of scraps!

Frozen family halloween costumes – Anna, Elsa & Kristoff

Another year, another set of Disney Halloween costumes! Last year for Halloween the kids decided that they all wanted to dress as characters from Frozen. They weren’t into the hype when it was a new movie but it grew on them and the girls especially were very excited to dress as sisters. I was excited for another chance to sew up some movie inspired princess dresses since I had so much fun the year before. All of the costumes were made without patterns and with the aim of creating garments that would be as screen accurate as possible while still being comfortable and wearable for kids. On to the photos!

Frozen family costume

I constructed Anna’s costume in four separate pieces, a long sleeved mandarin collared blouse, a vest, a circle skirt and a cape. The blouse fastens with two hook and eye clasps and has ribbon detailing at the neckline. The vest is made of a slightly stretchy thick knit fabric that can pull on over the head without any type of fasteners. All of the embroidery on the vest was mimicked with felt which was hand stitched into place. The skirt is a full circle skirt for maximum twirling and the designs were hand painted using acrylic paint mixed with fabric medium. The cape is made of a thick flannel and edged with pompoms. The heart shaped clasps were made of sculpey clay and are attached on top of a large hook and eye closure.

Anna Frozen girls halloween costumeAnna frozen girls halloween costume

Elsa’s dress was sewn to be pulled on over the head without fasteners as well. The main sequined bodice piece is fully lined in a costume satin to avoid itching and wraps from the front around the sides and into the back. It is split in the center back underneath the cape and the back panel is a shirred costume satin in a matching color. The shirred panel allows the dress to be stretched to pull on while still appearing fitted. The skirt was sewn from a solid colored costume taffeta and hand painted with streaks of silver and light blue as well as glitter (never too much glitter for a children’s costume!) Elsa doesn’t wear a crown in her ice princess dress in the movie, but that didn’t stop us from making one (because tiaras are so much fun, obviously).

Elsa frozen girls halloween costumeElsa Frozen girls halloween costume

The Kristoff costume is four pieces. A long sleeve light grey knit shirt, a pair of dark grey knit pants, a belted fleece tunic and a fleece cap. The tunic has ribbon and faux fir as edging and the belt is made from two ribbons sewn together. The cap has a fleece pompom. Kristoff’s costume wouldn’t be complete without Sven and we used a puppet that we already had at home as his trusty sidekick.

Kristoff Frozen boys halloween costumeKristoff Frozen boys halloween costume

Not wanting to be left out of the Halloween fun, I decided to make myself a costume last year as well. My husband and I decided to dress as the parents from Frozen, who never are called by name during the movie, but Disney wikia claims are named King Agnarr and Queen Iduna. They only have a few minutes’ worth of screen time so it was hard to dig up reference photos for their costumes but it was a fun challenge. Queen Iduna’s costume is made in three pieces, a long sleeved mandarin collared shirt with ribbon at the neckline, a purple underdress and a black overdress with painted detailing on the back. All of the ribbons on the overdress and coat were hand painted to mimic the patterns on the movie costumes and the medals and overdress clasp were made of painted sculpey clay.


Frozen parents halloween costumeFrozen parents halloween costumeFrozen parents halloween costume

In a last minute day before Halloween decision we talked my mom into wearing an Olaf costume (because what is Frozen without Olaf?) I used a white hooded sweatshirt and added felt buttons, eyes and eyebrows and pipe cleaner twig hair. The nose was a cone of orange felt and she wore white pants. A super easy and quick costume and she was a huge hit while we were out trick or treating.

Frozen family halloween costume

Once again a highlight of the Halloween season was taking the kids to Disneyland to meet the real Anna and Elsa. I’m a little bit sad that the kids have decided on non-Disney costumes for this year’s Halloween, but it will be fun to have total creative freedom with the sewing this time around. One month to Halloween… time to get started!

frozen family halloween costume

Frozen family halloween costumes – Anna, Elsa & Kristoff

A rainbow patchwork baby quilt for Raylan

I finished this in December of 2014 and somehow never got around to sharing it. I have made a quilt for each of my nieces and nephews and this one is for my nephew Raylan. He is a rainbow baby and I knew that I wanted to make him a rainbow quilt, but without it being too overly themed so that he wouldn’t outgrow it too quickly. (For those that might not know, a rainbow baby is one born after a pregnancy loss. Raylan was born a year after the birth of my nephew Peyton, who was stillborn. You can read more about Peyton, Raylan and little sister Coraline on my sister’s blog – Peyton’s love.) I decided make a simple patchwork quilt from a rainbow of Kona cotton solids arranged randomly.

rainbow-patchwork-baby-quilt-1

The backing is a solid blue flannel with a cloud applique – a little nod to the sky and rainbows. The label is a painted message along the bottom of the cloud.

rainbow-patchwork-baby-quilt-2

I finished this quilt with a handmade bias binding, machine sewn on the front and hand stitched in the back.

rainbow-patchwork-baby-quilt-3

This is the first quilt that I made using a wandering quilting stitch instead of straight lines.  I did a fairly widely spaced pattern and was surprised at how quickly it went.  It’s not perfect by any means but I’m happy with how it adds a cloud-like feeling to the back side of the quilt.

I’ve also (finally!) finished Edith’s baby clothes quilt and will be sharing that one next!

A rainbow patchwork baby quilt for Raylan

Belle, Rapunzel & Pascal halloween costumes

It’s the time of year where I start to think about sewing Halloween costumes for the kids and in between frantically searching “Elsa ice queen costume” and “Anna jumper tutorial” I suddenly realized that I never shared photos of the costumes that I made for them last year. The girls were (are) in full on princess obsession mode and each chose their favorite, and Paul wanted to coordinate but was adamant that he wasn’t going to be a prince. I stumbled on this tutorial for a Pascal costume (the sidekick iguana from the Disney movie Tangled… if you’re not familiar) and he was instantly sold since Edie was already planning to be Rapunzel from Tangled. I didn’t take photos of my process of making the costumes because a) I don’t have time for that sort of stuff these days and b) most of the ideas I used in making the costumes were gathered from other generous bloggers who had shared their completed projects and processes. Instead I’m sharing links where applicable. And lots of photos… because I just couldn’t resist.

Rapunzel Belle and Pascal halloween costumes

I took the photo below while the costumes were still in progress so the yellow wrap on the Belle costume wasn’t finished, but this is the best shot of Pascal’s tail, the twirliness of the Rapunzel dress and the major poof in the Belle costume.

Rapunzel Belle and Pascal halloween costumes

The Belle costume was sewn almost 100% as written directly from this amazing tutorial for a child’s Belle costume. I couldn’t possibly write enough good things about this tutorial. It had so many great ideas, especially the shirring. What a genius idea for a kid costume – no zippers or buttons and it fits a wide range of sizes. It’s never going to look baggy. It was perfect. The tutorial was written for a toddler so I knew the skirt wasn’t going to work exactly the same way on a much taller child. I added more width and also planned for and sewed a simple petticoat to go underneath for maximum poof factor. I also made some quick and easy yellow fingerless gloves, based on this tutorial. Add a rose and hair donut and presto. Belle is ready for the ball!

Childrens Belle dress halloween costumeChildrens Belle dress halloween costume

The Rapunzel costume was a combination of many tutorials and as you might guess… sort of (extremely) involved to sew. I took the basic idea for the bodice construction from the Belle tutorial (because, once again, shirring! Genius!) but added lace detailing at the top and bottom and a couple of ribbon loops for lacing in front. I used some sleeve tricks from this other Rapunzel dress tutorial (coordinating with the Pascal tutorial from earlier). I sewed the stripes on as shown in the tutorial, but attached the sheer portion before sewing the entire thing into a finished sleeve. It took me a couple of tries to get the order of operations right, but I think it was worth the effort. I decided that the skirt had to be a full circle skirt to really match with the movie and I used two colors of fabric panels to mimic the center underskirt. I don’t have an embroidery machine (or the kind of time required for hand embroidery or applique) so all of the detailing on the skirt is painted on. I finished up the costumes too late to order a wig online (and most of them were over the top expensive anyway) so I made a yarn wig from this tutorial and glued in silk flowers to finish it off.

Childrens Rapunzel dress halloween costumeChildrens Rapunzel dress halloween costume

Rapunzel! Rapunzel! Let down your hair! She was insistent that the yarn wig reach all the way to the ground for authenticity, so she spent a lot of time with it looped over her arm in an attempt to keep it from getting dusty.

Rapunzel and Belle childrens halloween costumes

Pascal was constructed entirely from the tutorial I linked above. Why mess with a good thing? Especially when it is so quick and easy.

Pascal from Tangled childrens halloween costume

The kids had a total blast on Halloween showing off their costumes… but my favorite part of the entire project was seeing them with the “real” Rapunzel and Flynn Rider at Disneyland. I can’t wait to get started on the next batch of princess costumes!

Rapunzel Belle and Pascal halloween costumes

Belle, Rapunzel & Pascal halloween costumes

A triangle baby quilt for Coraline

This was probably the most challenging quilt that I have ever sewn. Which is saying something about all of the other quilts (that they’re pretty simple). I loved the idea of a triangle quilt and I spent ages looking at tutorials to show me how to make one. I used a few different ones (this one, this one and this one) but even so my first several rows of triangles ended up with all sorts of wonky intersections. It wasn’t until the last few rows that it really started coming together into nice points. I’m just going to say that it gives my quilt extra charm.

Equilateral triangle baby quilt by Katy Regnier on Permanent RiotThe back of the quilt has a row of strips from the leftover fabric from the front, just because I can’t stand to leave the back of a quilt plain (even if it would be a time saver and I could always use a time saver).

Equilateral triangle baby quilt by Katy Regnier on Permanent RiotThe majority of the fabrics (the prettiest ones for sure!) came from my friend Jean (thanks Jean!) who was trying to get rid of some fabric that no longer sparked joy for her (thank you to Marie Kondo too!) and I am so glad that she gave them to me because they were definitely the inspiration for the color palette that I chose for the remaining fabrics.

Equilateral triangle baby quilt by Katy Regnier on Permanent RiotMy favorites are the bright reds and deep purples, I love how they pop out when you see the whole thing together.

Equilateral triangle baby quilt by Katy Regnier on Permanent RiotI finished this quilt with some hand sewn bias binding and a painted label. I still just don’t seem to have the patience or talent for nice hand embroidery so I prefer the look of a painted label for now.

Equilateral triangle baby quilt by Katy Regnier on Permanent Riot
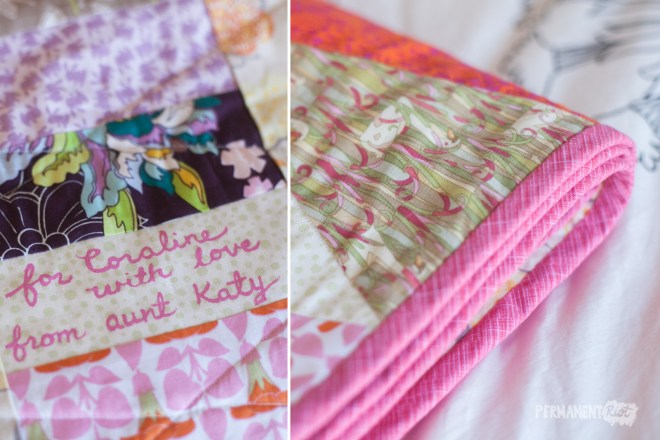
Hooray for finishing another quilt! I was hoping to have this one done by Christmas but was able to hand it over completed on the 26th. Not too bad for a hectic holiday season. I also finished one other quilt, the one I had been working on for ages for big brother Raylan, so I will be sharing that one next. Now if I could only finish up that baby clothes quilt for Edith…

A triangle baby quilt for Coraline

Hey, look! I sewed a dress!

It’s been a really, really (really) long time since I sewed anything for myself. Most of the things that I make are either gifts for friends or relatives (or babies of friends or relatives) or clothing for my children. Over the summer I also sewed a bridesmaid dress for my sister, and while I was working on it I started lamenting the fact that I hadn’t made myself a dress in years.

One of my favorite dresses to wear on a weekday was this soft green one I have had for over 5 years, but since it’s so well loved it’s starting to show its age. I’ve been thinking about making a replica for a long time, but I finally got up enough motivation to actually do it. Taaadaaaaa!

DIY sewing - copy of ready to wear dress on Permanent Riot
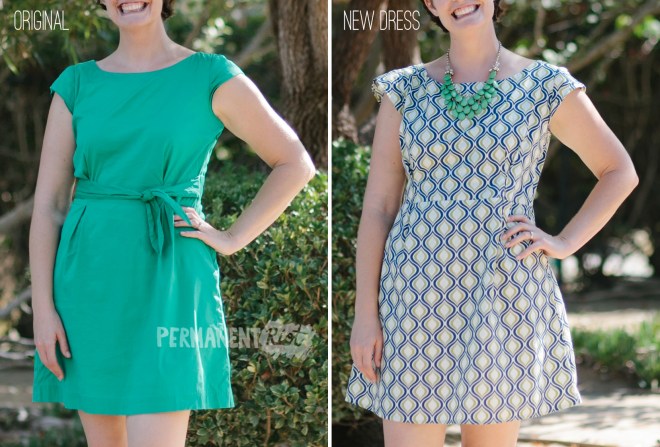
The original dress was so comfortable and so easy to wear – looks like real clothing but feels like pajamas is my gold standard – so I couldn’t resist making one that fit exactly the same. I just pulled some cotton out of my fabric closet (hoarder stash?) to make this. It’s a quilting cotton so it obviously doesn’t have the exact same drape as the original, but it works for me.

DIY sewing - copy of ready to wear dress on Permanent RiotDIY sewing - copy of ready to wear dress on Permanent RiotSince I never zipped or unzipped my original dress (it had a hidden side zip) I decided to leave it off, and I thought that the tie sash might be a little much with the busy fabric pattern so I left that off as well. It was such a quick and easy project – just a simple trace and cut and an afternoon’s worth of sewing. It’s the kind of project that makes me wonder why I don’t make more things for myself… especially when I can have a new version of my most comfortable and long since out-of stores dress in just a single afternoon without even leaving the house. I think I need to make more of these…

DIY sewing - copy of ready to wear dress on Permanent Riot

Hey, look! I sewed a dress!

Easter dresses and bowtie {sewing projects}

Easter was in April – which was about 6 months ago. Yikes. I meant to post these quite a while ago – sewing the kids matching outfits was #25 on my 30 by 30 list. I turned 30 in August and actually checked off quite a few more of the list items, I just haven’t gotten around to writing about them… I really want to do a recap also.

In any case I did manage to get this one done on time and I even had big dreams of making a post about how I sewed these dresses – I whipped them up in about a day without a pattern and (aside from the miscalculation on the length of Edith’s dress… it’s a bit short) was pretty pleased with myself about how well they came out. I want to make them more dresses like this (maybe with a few tweaks or alterations to the technique) and if I do I am hoping I’ll get it together enough to document the process for a tutorial.

Here are a few pictures of the outfits in action –

easter-outfits

The dresses had a simple split back lined bodice – Amelia’s closes with little adorable yellow round buttons and Edith’s closes with pearl snaps (hard to get a baby to hold still long enough for buttons). The skirt is just a basic gathered skirt and the sash is sewed on the sides and ties with a bow in back. I actually used leftover fabric from their second birthday party – the same stuff that I made Amelia and Paul’s Easter outfits from the year before out of. The chick/egg design is a repeat as well – that’s what happens when you ask a 3 1/2 year old what they want on the dress – they say they want just what they had last time. Oh well. I still think it’s adorable. Paul’s bowtie was made using this tutorial from say yes to hoboken… super quick and easy!

One more item crossed off the list. Phew!

Easter dresses and bowtie {sewing projects}

Stuffed fabric turtles {sewing projects}

I was reading through my google reader the other afternoon and the kids were playing near my computer. When they looked up and saw these stuffed turtles from make it and love it they went totally nutso for them. They especially loved the photos of the turtles out in the grass and they REALLY wanted to have a turtle of their own to take out to the grass. Lucky for them I had lots of fabric scraps sitting around and even some spare stuffing (from all this winter’s amigurumi animals) so I was able to whip these up quickly in one afternoon.

stuffedturtle

Amelia actually sat around and watched a lot of the sewing process but Paul quickly lost interest when he realized it was going to take more than 5 minutes for his turtle to appear.

stuffedturtle2

After the first turtle was finished the kids took him outside to test him out in the grass while I sewed the second one. They approved of the turtle 🙂 A very quick and easy project for a lazy afternoon… and pretty cute too!

Stuffed fabric turtles {sewing projects}

Easter dress and overalls {sewing projects}

Sewing… wow… it’s been a while!

I’m pretty sure the last big project that I sewed was the kids’ Halloween costumes (did I never blog those either? Oops! They were adorable, I should really post those.) Then my machines got set to the side for a while while I went on a crochet and knit spree for the holidays. After that I took a break from all crafting in general while I was horrifically ill (thanks a lot morning sickness) Now that I’m in the glorious second trimester and feeling great I’m back to crafting again and sewing has been my medium of choice.

I decided to make Paul and Amelia outfits for Easter this year, although I kind of waited to the last minute to put them together. I decided that since we were going to be moving soon (actually the move has now already happened, I’m that behind on blogging) that I didn’t want to buy any new fabric that would just end up as scraps in my stash needing to be moved. Instead I used some of the leftover fabric from Paul and Amelia’s birthday party in September – it was originally going to be a pair of overalls for each of them to go with the train theme (and it was also used to make their hats) but I never got around to it and I’ve had a few extra yards lying around for ages now.

For Amelia’s outfit I decided to make a snappy toddler dress from prudent baby. I loved how simple and yet adorable the dress is. I just used the striped fabric for the main body of the dress, a solid blue I also had in my stash as the collar and some scraps of yellow for the little chick applique. That was Amelia’s addition – I asked her which springtime animal she wanted on her dress and she picked a chick!

easterdress

It was pretty straightforward with the only tricky spot being the attachment of the collar. It was sewed with right sides together and flipped to be pressed, but part of the collar that stays open (to insert the body of the dress) is curved and I found it a bit challenging to press it on a curve when there wasn’t anything holding it in that shape. In the end I think it turned out fine… as with most of my projects the imperfections were jumping out at me when I first sewed it but it is harder and harder to see them as time goes by.

Paul finally got that pair of engineer overalls that I had been hoping to make him. One of the reasons I never made them back in September was that I couldn’t find a good pattern. I scoured the internet as well as my local fabric shop (I was willing to pay for a pattern but never found one!) but couldn’t find a good pattern for simple toddler overalls. Lucky for me a pattern had been posted between September and the time that I set out to sew the Easter outfits. This shortall pattern from ikatbag was perfect – I just lengthened the legs to make it into pants and voila!

easteroveralls2

I have to say that of all the patterns I have tried from the internet this one is in the running for most thorough and clearly explained! It was so easy to follow each of her directions and all of the detailed info on finishing and pockets really made this a durable (and adorable!) project.

The kids LOVED their Easter outfits and I had fun taking a few photos of them in the yard both the day before Easter and the day of when they went on their egg hunts. Is there anything cuter than matching toddlers who are super excited?! I think not!

easterdress2

easterdress3

easteroveralls

easterdress4

So there you have it – proof that I have indeed been sewing (and that I’m alive for that matter!)

Even more exciting I have another post coming in just a day or two… you’ll never believe it… Paul’s quilt is almost done!! Remember when I posted Amelia’s quilt (yes, that was almost an entire year ago!) and said Paul’s was coming soon? Well the finished top traveled with us to Boston last summer and almost came back in exactly the same state that it left in. I had a surge of inspiration (or maybe it was shame at letting a project go so long untouched?) right as we were moving out and got the whole thing basted and quilted and all of the binding attached by machine to the front of the quilt. The only part that isn’t yet completed is the hand tacking of binding onto the back. Hopefully that will be done in the next day or two. Stay tuned!

Easter dress and overalls {sewing projects}

A coffee date dress for me {sewing projects}

In case you hadn’t noticed, most of the things I sew are either for the kids or for gifts. For some reason I just get more excited about making teeny tiny clothes. Maybe it’s because they get finished so much more quickly. Or maybe it’s because I love taking pictures of the finished products on my tiny models. For whatever reason even when I see a project, pattern or tutorial and think I “simply MUST sew that!” it still takes me weeks or sometimes months to get around to it. Such is the case with the coffee date dress, which I first saw on the Grosgrain blog (have you seen it? It’s FABULOUS!)

I liked the style of the dress immediately and I also liked the fact that the tutorial was broken up into such nice manageable chunks of sewing complete with useful photos. Perfect for me since I’m still a little wary of sewing things for myself. I wanted a bright and cheerful dress so I picked out this blue fabric and I also liked the addition of the sash so I picked a fun yellow to go with it. I considered doing a white top and blue skirt like the tutorial shows but I was worried that the top would be too transparent (necessitating some sort of camisole underneath) and decided not to do it. I really wish I had as I like the color of the dress but I think there might be a bit too much of it. Oops. Live and learn. I also made my first attempt at installing an invisible zipper (following this invisible zipper tutorial) and while I thought I followed it to the letter, the zipper is in, works and is not offensive to look at, but it is definitely NOT invisible (oops again). My only other real stumbling block was with sizing. I measured myself and tried to find my size on the burda chart. I have a weirdly large rib cage (or something like that) because my chest measurement put me at a larger size than the rest of my measurements and I was worried that the bodice was going to be too snug. I was actually debating between two sizes and went with the smaller one (thank goodness) and the dress is still too roomy. I think I am going to take it in right around the waist area. I’m not sure what that’s going to do to the sash which is why I’ve held off for now.

Other than that I’m pretty pleased with the result. I had Ben take a few pictures of me wearing it so that I could show off on the blog. I really need to get lessons in posing for the camera because I’m absolutely terrible at it. Usually it goes something like this – I stand awkwardly looking away from the camera because I don’t know what to do. Ben takes a picture, makes fun of me for not looking at the camera or looking sad, so I look up and make a goofy face that I’m later embarrassed about.

Exhibit A

coffeedatedress4

and Exhibit B – even goofier face still

coffeedatedress

A coffee date dress for me {sewing projects}