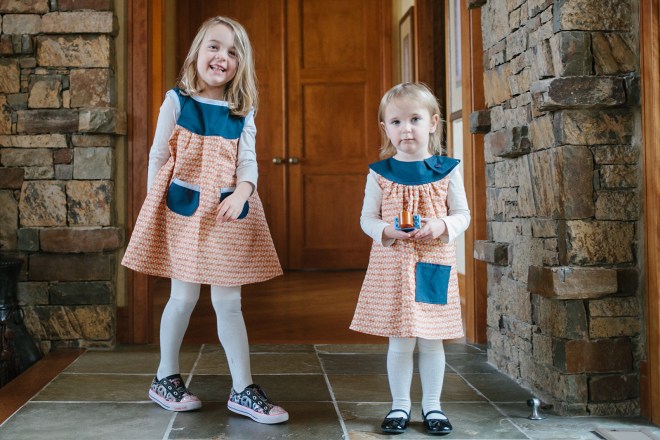
This year for Christmas I got the idea to make all of the little girls in the family (cousins on both sides – that’s 5 all together) coordinating dresses. Aren’t they ridiculously adorable? (one is not pictured if you’re wondering whether or not I know how to count)

I called this post “coordinating cousin dresses” but another title could very well have been “the dresses that almost weren’t” or “how to pull an all nighter the day before flying”. I don’t know why but this is always (always) the schedule when thinking up Christmas presents – about a month before I get an idea for what I might like to make. I spend a few days thinking about the idea and deciding if I do really want to make it. Next I move into research mode – googling like a crazy person looking for patterns, blog posts, ideas and inspiration. Even if it’s an idea that I’m sure I have dreamed up on my own, I still google to see if anyone else has done it (and how). This phase is the longest. I can easily waste away several weeks on blog surfing, pinning and thinking. I spend SO much time in fact that I wake up one day and realize that it’s one week before Christmas and I have done absolutely nothing. Next comes my frantic trip to the fabric store where I wander aimlessly and make a total wild guess as to how much fabric (or yarn, or other supplies as the case may be) I will need to complete the project. Because (of course) during my “planning weeks” all I really did was mindlessly click links and not actually make any decisions, so I haven’t *really* decided what exactly I’m making or how much material it will take. The rest of the week is spent frantically crafting and hoping and crossing everything that I don’t run out at the end (because obviously the last sewing is being done at 2am when more fabric cannot be acquired). Thank goodness that this one came together at the end, I would have hated to show up to our family Christmas empty handed.
The best part of this whole giant sewing bonanza is that all of the girls actually really liked their dresses (hooray!!). I think the fact that they’re cotton and roomy makes them super comfy (I didn’t get to try one on… obviously… but they look pretty cozy to me). Amelia has been wearing hers often, pretty much as soon as I wash and hang it up in her closet she puts it back on. That kind of reaction is definitely what I’m looking for when I start sewing and it’s what keeps me coming back for more.
Amelia’s and Edith’s dresses were the first two that I tackled and both of them followed online tutorials that I found – Amelia’s is the adorable Leah tunic from Craftiness is not Optional and Edith’s is the Black Bird tunic from Schwin and Schwin lengthened to make a dress.

Both of the tutorials were relatively straightforward and easy to follow, I loved that the Black Bird tunic had a printable pattern, when you’re in a hurry sometimes it’s nice to just be able to follow cutting lines rather than drafting your own pattern. If I were making it again I would probably make a few changes to the construction – somehow having the raw top edge of the skirt piece encased in the neck would be nice and I would also probably add a little facing to the armholes only because I think it looks a bit cleaner. Both of those probably would have added time to the project (which I didn’t have) and the dress as is worked well so I’m happy with how it turned out. Edith especially loves her pocket!

The Leah tunic isn’t a pattern but rather a tutorial on how to draft your own pattern and construct the dress from the pieces you’ve drafted. I will say that I totally (100%, I should have taken a picture of how terrible it was) botched the sleeve shape on the first go-around. Luckily I was able to save it, but it was a bit trickier than I’d imagined. Amelia loves (LOVES) this dress and I do too, it reminds me of one of the dresses that the little girls in the cozy book might wear, and I want to make her a hundred more of them. I will say that I am not a huge fan of bias binding the armholes, I’m just not very good at it and I think my dresses look cleaner when they are lined (at least on the bodice) so I might try that next time and see how it turns out. I know that it’s a cooler dress if it’s unlined (better for summer) but with my wobbly sewing I feel like the bias tape gives away the fact that I am not an expert seamstress.

Once I got done with the first two dresses I realized that I really didn’t have time to mess around finding and following more patterns, as cute as they may be, so the last ones were just simple lined bodices with a split back and button closure, with pleated full skirts. No pattern, just tracing of t-shirts in the correct sizes and a big rectangle for the skirt. Not having a 15 month old to model for me, I definitely underestimated the length of the littlest dress (it’s much more of a tunic) but aside from that slip-up I think they turned out just as well as I could have hoped for. And all done in time to open for Christmas. Hooray! I consider it a sewing success.


 Happy Valentine’s day! I hope your day was full of lots of love and sweet treats!
  My very favorite part of all of the decorating we did was the giant “I love you so” scrawled in cursive along the top of one of the walls. It was actually Ben’s idea and I am absolutely sure we will be repeating this concept in the future – it’s so easy! Crepe paper streamers are the perfect medium for this kind of project – they’re stretchy and not likely to break, they keep their shape when they’re creased and are very lightweight so they stay up with just the tiniest bit of tape. I freehanded my letters as I went, but I’m sure you could sketch out your pattern on the wall ahead of time if you’re worried about getting it just so. If you’ve ever used the pen tool in Adobe Illustrator or drawn a spline in a CAD program, this lettering is the same idea. You only need to tack down the letters at “anchor points” where the streamer is curving or changing direction, not along the entire length. I actually used very little tape for this project, considering the final effect. The whole thing probably cost us around fifty cents. (as a nerdy side note, if you have some free time on your hands,
  The day went by in a blur of crafting and chaos (as they tend to do) – and we even managed to make some cards for the kids to take to the “friendship party” that they had at preschool this morning. I really wanted them to be a part of making the valentines so I asked them to paint with watercolors on sheets of white paper. After the paint was all dried they cut out circles from their drawings with my hole punch and wrote their names on the back. By the time they finished writing their names on every paper they were pretty burnt out of crafting so I finished them up on my own – but it would be pretty impressive if they could write in cursive, wouldn’t it?
  Overall I’d say the day was a smashing success. Once the kids were in bed, Ben and I cooked up some amazing mini chocolate souffles (I had no idea they were so easy to make – I’ll be making them again soon for sure!) and watched a terrible cheesy romantic comedy. I hope your Valentine’s day was just as much fun!
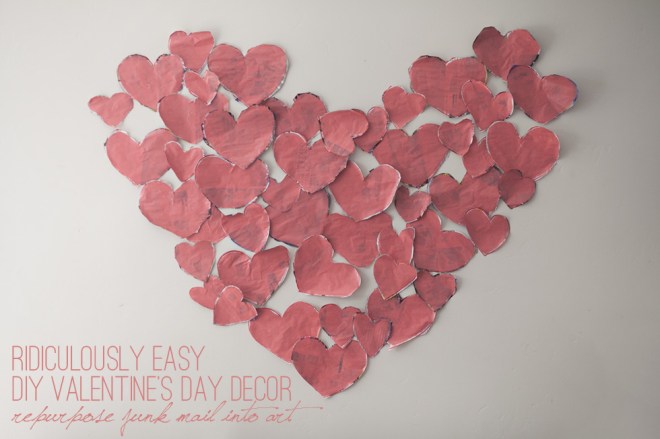 I don’t know about you but I can’t stand junk mail. CAN’T STAND IT. I have signed up on a few lists and websites that promise to cut down on the amount of trash mailing you’ll recieve but so far I haven’t noticed any difference. It breaks my heart to go to the mailbox and pull out a mountain of paper, only to dump 90% of it directly into the recycling bin. Sure, recycling is better than trashing, but in the old “reduce, reuse, recycle” slogan, recycle is a last resort if you can’t reduce or reuse. Lately I’ve been making it my mission to reuse things that come into our house before I throw them out, and this morning I had an idea for what to do with just a small handfull of that dreaded junk mail.
 My kids loved doing this project with me and they also loved the final effect. The kept saying that the hearts looked like birds flying off the wall, which is quite lovely, don’t you agree? I used these hearts for a backdrop for the kids’ valentine photo but that’s going to stay under wraps for just a few more days – you’ll see it on Thursday, promise!


